
Are you not tired of having a million apps pre-installed when you launch Windows? I’m sure you do! This article contains over 7 different ways how to debloat Windows 11 with a script and debloater tool that actually make a difference. This will make sure that any Apps or Services that are dormant or not needed will be deleted. If you are really after a slim-down OS then Windows 11 Ghost Spectre ISO could be the choice because of absolutely no bloatware from scratch installed.
What is a Debloat Tool for Windows 11?
Honestly, there is no official tool as such however the ones available currently were set up by enthusiast developers as open-source projects. The two available ones currently are ThisisWindows and Windows 11 Debloater Script which is made in Powershell. Now, you’d ask do they work? Yes, they are designed to look for any service and disable or remove it and leave it that. It does not block any services such as RoboCopy or even SSH that you may have used.
TLDR: No harm no foul is caused and the changes can also be reverted.
Beware: It will also remove Windows Web Experience Pack if you have it installed.
5 Ways on How You Can Debloat Windows 11 (Tested and Working)
Windows 11 Debloat Script – Best Windows 11 Debloater
This is a PowerShell script created that you have to run and it does everything for you in one go! Yes, you no longer have to look into various setting menus. This tool includes the simple .bat file or the .ps1 format that you need to launch with admin privileges and it will do the rest.
Windows 11 Debloater Script (Powershell)
Remove Apps or Games No Longer Needed Regularly
- You need to press “Win Key” + “x” from the keyboard and choose “installed applications” there from the menu.
- Next go through the entire list and check which applications you are not going to use.
- After this click on 3 dots which are next to the application which you intend to remove, choose “uninstall”.
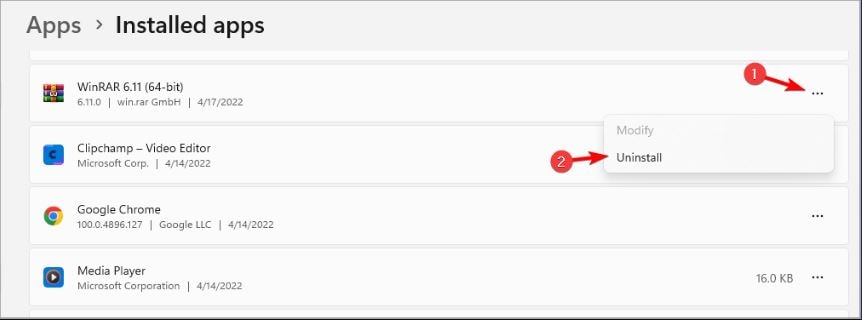
- Click on “Uninstall” to confirm.
- For all the applications that you want to remove, repeat the last two steps.
At times the operating system shall not allow you to uninstall a few applications by greying out the uninstall option.
These are called system applications and come with the operating system.
Run Windows 11 Free Debloater Utility – ThisisWindows 11 Alternative Debloat Tool
We have had some reports of Windows Defender and other Firewalls that have blocked this application from running on their system which means you might have some issues while starting it.
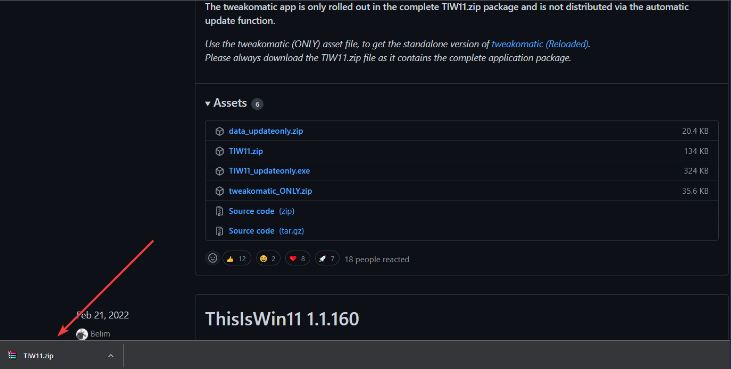
- Look for Teeotsa Windows 11 Debloat Tool on GitHub.
- This shall start download for this .zip file.
- As the process of downloading is completed, you need to double-click on it to open.
- You can also follow the file to download section and select the “extract all” option.
- As soon as the file has been uncompressed, look for “TeeotsaWindows11DebloatTool.zip” file and double-click on it.
- You system might how in a warning, hit “run anyway”
- As you are done, click on “apps” section there on the left side of the screen, you shall see the applications list.
- After this press and hold the “ctrl” button from the keyboard and select the application you want to remove.
- Next click on “move selected” button present in the middle of the windows to move applications to recycle bin.
- By clicking on “move all” option you can remove all the applications, but we don’t suggest this.
- If you intend to remove system applications, the ones which Windows 11 version do not allow to uninstall, click on “show system apps” to reveal them.
- Then click “ctrl + click method” once more to choose the different applications you want to remove.
- After this click on “move selected” option on the window.
- Click on “empty bin” button to empty the recycle bin.
Debloat Windows 11 via PowerShell Script – Increase Gaming Performance
- You need to press “Windows key” + “X” from the keyboard to open “Power Menu” on the system.
- From the list choose “Windows PowerSell”.
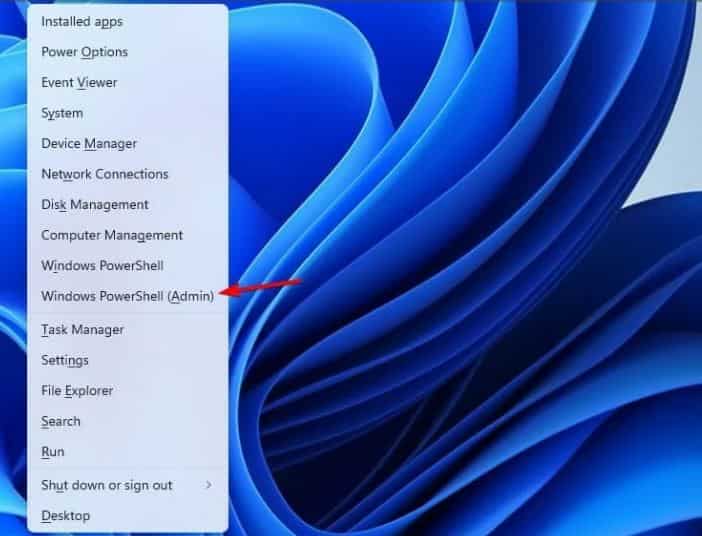
Note: few systems are not easy to tackle especially when it comes with missing or corrupted system files and repositories of Windows, so make sure to use a dedicated tool like Fortech as it is designed to scan and replace broken files with fresh versions from the repository.
- After this, you need to run the following command:
C:\Users\Paul> Iwr https://github.com/teeotsa/windows-11-debloat/blob/main/Launch.bat
- In the bloatware section, you need to click on “customize blocklist” as this will allow you to pick a certain application you will remove while leaving the rest intact.
You might get an option from Windows Debloater to remove all bloatware. We suggest you avoid this option and manually select what file you want to remove.
You need to follow on-screen instructions to complete the process of removal.
This is a great way as it is a built-in command line tool that allows you to manually remove all unwanted applications and tools on your system, including system applications.
SEE ALSO: 9 Disk Defragmenters for Windows 11 To Improve Performance.
Remove Bloatware via DISM Method in PowerShell
- To open the WinX menu, you need to click “Windows + X” keys from the keyboard.
- Once there, choose the “windows PowerShell” option.
- You need to copy and paste the following command on the terminal.
C:\Users\Paul> DISM /online / Get-ProvisionedAppxPackages
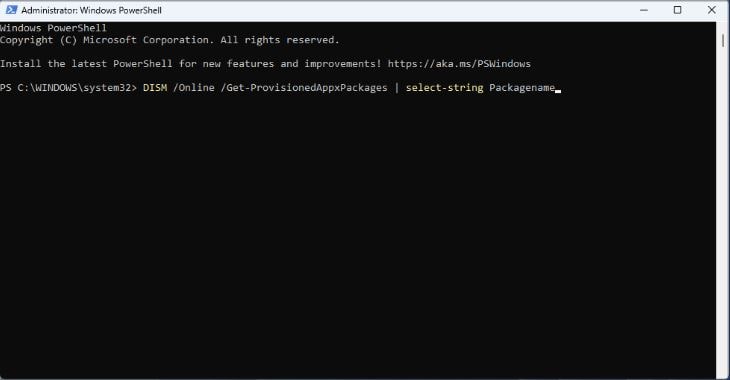
4. The following script shall show you all the packages that are installed on your system having Windows 11
5. Review this list manually to see which applications you want to remove.
6. As soon as the application has been located you need to highlight it by clicking on “Ctrl + C” from the keyboard.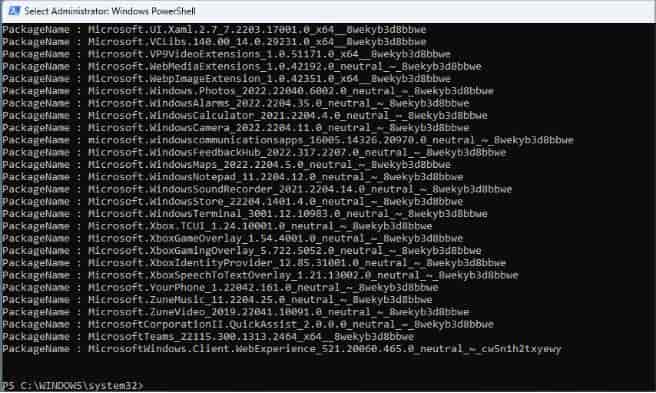
7. Next, you need to copy the following script and use such name which you want to remove at the end. Replace “NameofAppYouDontNeed” with your app name, example is below:
C:\Users\Paul> DISM /Online /Remove-ProvisionedAppxPackage /PackageName:NameofAppYouDontNeed
8. Hit “enter” to remove it entirely from the system.
Other Ways To Debloat and Make Windows 11 Faster
Not using Backups? Disable OneDrive
Uninstall this from your system if you are not using it. You shall not see I am uninstalling Microsoft One-Drive pop-up in start-up windows or it shall not ask for backup at random times. It shall only take a few minutes to complete the entire process.
Who uses Cortana anyway?
Version 11 opens; disable “Cortana” if you are not using Microsoft voice assistant. Removing this shall take only a few seconds. Cortana for now is not working in the background.
Stop Software in the background
Few applications run in the background all the time like email clients, to save resources and make Windows 11 faster you can exclude programs from running in the background.
- You need to use key combination “windows key + X”.
- Choose “apps and features” entry.
- Scroll to the entry of the background application you want to adjust settings for.
- Again click on the three-dot icon > advanced options.
- Select “never” in the background apps permissions sections.
Notifications can be muted
- You need to access the “start menu”.
- After this click on “settings”
- Click on “system” present on the left-hand menu.
- After this open “notifications” and move the slider to “off”.
Adjust your Autostart Apps
As you start Windows, it shall run a few programs and services automatically. This one proves to be great for everyday apps. Like this, you don’t need to start communication tools such as email clients or Discords whenever you boot up your system. The programs more they run automatically the more system performance is affected.
You can disable autostart for programs and do not need to launch upon system start-up.
- Press ctrl + shift + Esc from the keyboard to Task Manager.
- After this switch to “Autostart”.
- Check the “status” column for programs listed as “activated”.
- Choose the program entry you wish to deactivate and right-click on it/
- Hit “disable”.
- Done.
Conclusion
Windows 11 is a great operating system overall with a decent visual overhaul. However, it can get slow because of the unnecessary software it comes with! How to debloat Windows 11 Script is what you can use to achieve further performance gains on your old laptop or computer without doing a hardware upgrade and also improve gaming FPS! Cheers.


