Python is a very popular and flexible programming language that came out in the early 1990s gained rapid popularity among users. It usually is not installed on any operating system as a default choice. This is why you can follow our guide on how to install Python on Windows 11 along with making sure Pip, IDLE and environment variable paths are set up properly for your environment.
Before you start
- System running on new Microsoft Windows 11 along with admin privileges.
- Command prompt, aka CMD.
- Remote desktop connection application.
Keep in mind: If you intend to install Python on remote windows servers only then use the connection application.
Install Python on Windows 11 in 5 Easy Steps (With Multiple Versions)
Choose the version to Install
You need to install the Python.exe installer and then run it on your system.
To select the version you need to see what kind of work you want.
For example:
For apps or projects coded in older Python v2.6 you would need to downgrade, right? No, you can run multiple versions which solves this problem.
For learning how to code in Python what we suggest is that you get the latest version of versions 2 and 3.
With version 2 you can work on older projects and even test out new projects for backward compatibility.
Use the Executable Installer
Follow the 3 steps below to get the Python executable Installer:
- You need to open a browser and head towards the “Windows Releases” section on its official site.
- Once there, search for the version you want.
- You need to choose either “windows x86-64 executable” or “Windows x86 executable installer”.
The exe file size is only 25MB. Really.
Windows x86 installer is needed for 32-bit systems and Windows x64 installer is for the 64-bit version
However, even if you end up installing the wrong version, we have a solution.
You can simply uninstall it, and start again.
Launch the Executable Installer
Once you have the .exe file downloaded, follow the 2 steps below to launch the installation process.
- Double-check to see that you have selected “install launcher for all users” as well as “add Python 3.x to PATH” checkboxes. This will ensure the environment variables are all set up correctly.
- Select “Install now”.
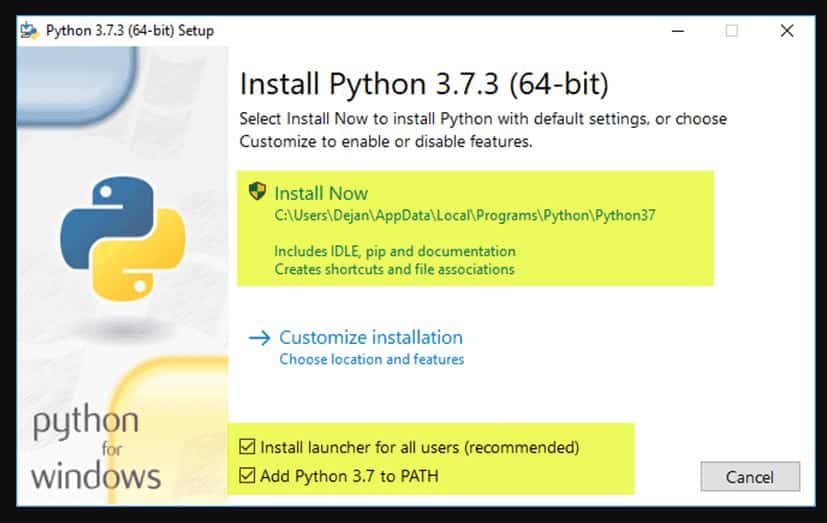
What we suggest is for installation includes:
- Pip – The standard package manager.
- IDLE – Provides a solid file editor feature.
You shall see a dialog box after this form which you shall select either to “disable path length limit”. As you select this option, It shall bypass the 260-character MAX_PATH limit. This shall enable Python to use long path names.
The limited option shall not affect the settings of the other system. If there are any potential length issues then what you need to do is turn this on.
Verify Python Installation on Windows
In this:
- On your system, you need to head towards the directory. In our case, this was:
C:\Users\Paul\AppData\Local\Programs\Python
- Double-click “Python.exe”.
- Output shall be as follows:
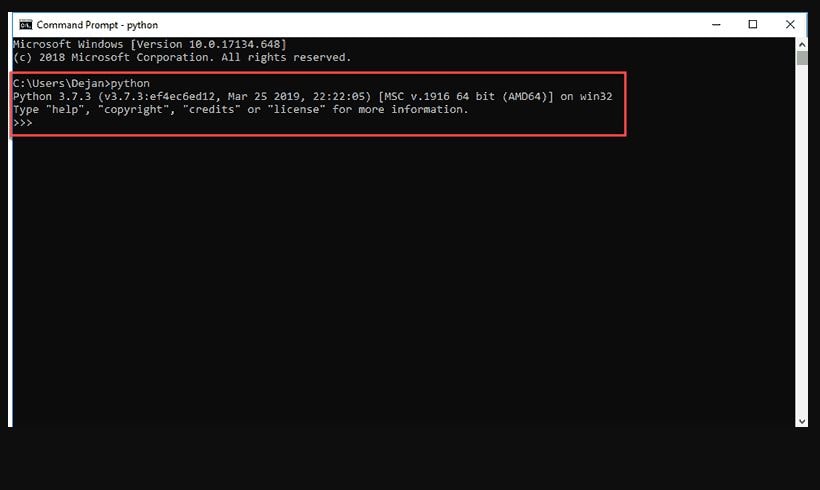
Note: To check installation was successful or not you need to type “Python –V” in the command prompt. You shall now see the installed version you have.
Pip is important
If you want to install Python’s older version then there are chances it does not come with pip installed.
What we suggest is that you use it for many packages of Python especially when the work environment is virtual.
To see Pip has been installed:
- Open “start” and type in “cmd”.
- Choose “command prompt”.
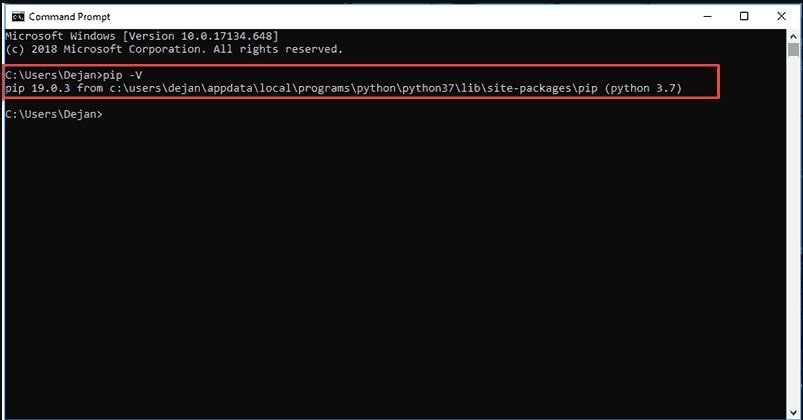
- In the console type “pip –v”.
To see if installed, you shall see the following output as in the screenshot below:
How To Add the Python Path to Environment Variables in Windows 11 (Somewhat Important)
If your version does not have the “add python to include” checkbox then go through this step. It is straightforward.
Setting this path to system variables alleviated the need to use full paths, this allows Windows to have a look through path folders for “python” as well as install the folder which carries the .exe file.
To start with:
- Type in “sysdm.cpl” and hit “ok”.
- You shall see windows of system properties.
- Head towards “advanced” tab and choose “environmental variables”.
- Underneath this, you need to find and choose “path” variable.
- Hit “edit”, after this you need to choose the variable “value” field. You need to add in python.exe file followed by (;).
For example in the screenshot is how we added them:

- Click on “ok” and close the window.
WE RECOMMEND: 6 Best and Free Python Compilers (Online & Offline Choices).
How To Install Virtualenv (If you do a lot of testing)
Till now you have both Python and pip now what is left is software packaged known as Virtualnv. With this, you can create an isolated local virtual environment for Python projects.
Now, here’s the deal:
By default Python software package comes pre-installed. In the same way, when the single project-specific package is changed, it changes for overall Python projects. Now, many would like to avoid this and prefer to have a completely separate virtual environment for each project which is deemed to be an easy solution.
- Open “start menu”.
- Type in “cmd” and choose “command prompt application.
- In the console type the following pip command:
C:\Users\Paul > pip install Virtualnv
Once completed, it has been installed on your PC.
Windows 11 Python Installation FAQs
Are Python Environment Variables important to have setup properly?
Yes, if these are not set you may not be able to use different versions of Python. You can set them by following the 3 simple steps below:
- You need to search for “advanced system settings” in the start menu.
- Choose “view advanced system settings”.
- In properties windows, you need to hit the “advanced” tab and then select the “environment variables” button.
How can I verify Python is installed?
This can be done either through the command line or the IDLE which gets installed along with installation.
Search for a command prompt and type in “Python”. It will display
C:\Users\Paul> Version 3.xx is installed successfully.
As an alternate, you can also search for Python in the start menu and click on IDLE. With the help of IDLE, you can begin coding.
Summary
In this tutorial, you have learned to install Python 3 on Windows 11 along with running multiple versions. We have explained in 5 steps along with adding the environment variable paths that are a crucial path for the process which many miss causing Python to not load properly in CMD. Let us know if you need any further help or guidance in the comment section below.


")

")
")
")


")
