
Maven is an automation and management tool that was developed by Apache Software Foundation and released in 2004. It is a project management and compression tool which provides users with a complete build life-cycle framework. This step-by-step tutorial shows you how to Install Maven on Windows 11 64-bit. If you are a systems administrator or a support engineer looking to make the installation quicker, we have also outlined the steps required to do so using CMD.
With Maven you can automate a project’s build infrastructure in no time as Maven uses a standard directory layout along with a default build life-cycle. It is quite a powerful tool that is based on Project Object Model.
It is able to simplify the build process such as ANT, keep in mind that it is too much more advanced than ANT. It includes information about the project and configuration information for Maven like the construction directory and source directory locations.
About Apache Mavin Features and Functions
Power to create profiles and set custom configurations
It is able to build profiles and a set of configuration values through which you can build your project by using different configurations. You might need to build a project for your local system for development and testing. To enable different builds you can add different build profiles to your POM files by using its elements of profiles which get triggered in different ways.
Official Plugin support
These help to perform a certain goal. What you can do is add a plug-in to the POM file. If we talk about Maven then it comes with certain standard plug-ins which you can use as well as implement in Java.
Create useful Life-Cycles from scratch
It carries a sequence of build phases in which each comes with a sequence of goal. Maven command is the name of the build life-cycle, phase or even goal. Now, whenever a life-cycle is requested executed by the given command then all the build phases in that particular life cycle get executed. When a build phase is requested executed then all the build phases before it there in the defined sequence are executed as well.
All data in a Project Object Model (XML) file
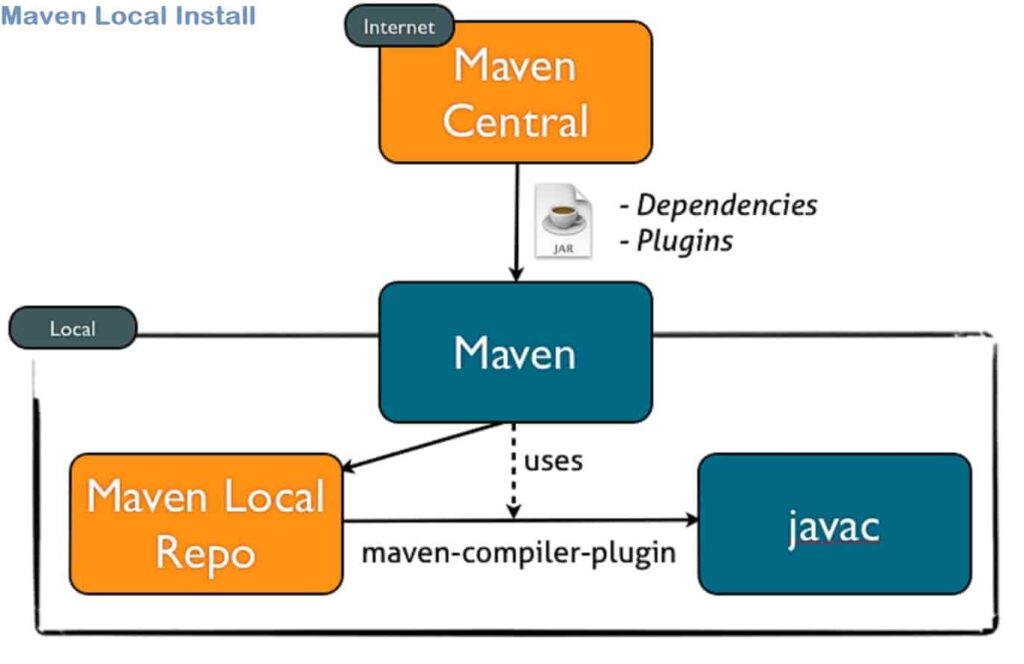
These files are XML which carries information related to the project and configuration information like dependencies, goals, and plug-ins. Source directories and much more are used by this to build a project. Now, whenever you execute a Maven command you give it a POM file in order to execute commands. It reads pom.xml file in order to accomplish both its operations and configuration.
Works great with Java, Ruby and C# projects
Maven is specifically much better for programming-based projects that are written in C# projects. You should not confuse Maven with code editors or compilers as those are different, an example is Dev-C++ which is an IDE built to write and compile code.
Locally stored dependencies
For those who do not know, dependencies are external Java Libraries that are needed for projects and repositories which are directories of packaged JAR files. If we talk about the local repository then it is just a directory present on the machine hardware. If in any case the dependencies are not found there in the local Maven repository, then it downloads them from the central Maven repository and then puts them in the local repository.
SEE ALSO: How To Create Your Own Web Server with Python.
Why use Apache Maven on Windows 11
Well, Windows 11 doesn’t come with any project management software installed by default. You only have Sticky Notes or Microsoft To Do. I am sure you will not use either because they are simple note-taking and task apps. Hence, when Maven is a much better choice and the one you should be using, below are some reasons why you should use and install Maven on Windows:
- Add jars and other project dependencies easily.
- Various documentation and guides are available online if a problem occurs if you have a problem.
- It provides project information such as log documents, unit test reports, dependency lists, and much more.
- It is helpful to project while updating the central repository of JAR’s and other dependencies.
- Integrate projects with source control systems like Subversion of Git.
- Build any number of projects into output types such as JAR without doing any scripting.
How To Download and Install Apache Maven on Windows 11
Important to know: What do the different configuration/setting folders do in Apache Maven?
- C: Folder is where Maven installs itself by default under a folder called “maven”.
- Bin folder carries batch files and shell scripts to run it on different platforms.
- Boot folder carries “jars” which are needed for Maven to begin.
- Conf folder carries the default “settings.xml” file which it uses.
- Lib folder carries the libraries which are used by Maven. Moreover, it also carries ext folder in which the third-party extension can extend override default maven implementation, which can be placed.
Step 1: Download Apache Maven for Windows 11 (64-bit)
Follow the steps below to download Maven for Windows 11, it is available in various formats including zip and tar.
- Visit the official Maven download page.
- Download the latest version, which is currently 3.8.6.
- Launch the installer and wait for it to finish.
Step 2: Add Maven Windows 11 environment variables and paths (JAVA_HOME and M2_Home)
As Maven is a build and dependency management tool which is for Java app development. Like other Java development tools, this is not installed as a Windows service rather it gets configured using Windows environmental variables.
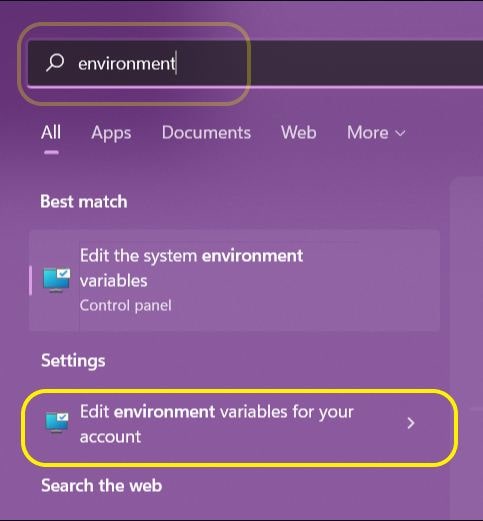
First, you need to have Java installed on your system and JAVA_HOME as a must-be set in the environment variables.
You need to add M2_Home to Windows environment variables, the value shall be the installation location on your system.
Keep in mind that this is an optional step but it is highly suggested, that many external IDEs and programming languages such as Python 3, as well as tools, rely on the M2_HOME variable to work with it.
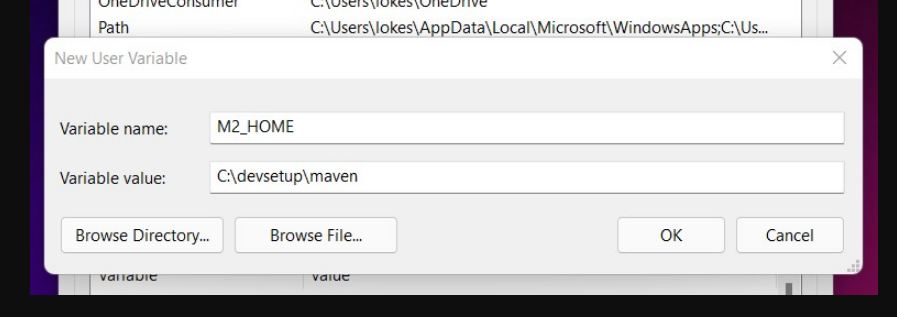
If you want to run its commands from the console then Windows need to be able to locate maven batch files. Update it with the “%M2_HOME%\bin” directory.
Step 3: Install Java JDK
- To install Java all you need to do is install “JDK Installer Setup”.
2. Now add the JAVA_HOME variable to “JDK installation”
On our system, it is pointing to the “JDK 18” installation folder.
Step 4: Test if Maven is working as expected from CMD
The installation process has now been completed, let’s test it from the Windows command prompt.
- You need to go to the “start menu” and type “Command prompt” in the application search box.
- Hit “enter”, new command prompt shall open.
- Here you need to type mvn –version and hit enter, example below:
C:\Users\Paul> mvn –-version
This command runs this batch file “mvn.bat” from the bin folder of the Maven installation location. This is why we have added a location to a PATH environment variable.
Now, after checking JAVA_HOME and optional arguments (Maven_OPTS).
This will show you information on the maven version, the path to the maven bin folder, and installed Java Version.
Install Maven using CMD (Alternative Method)
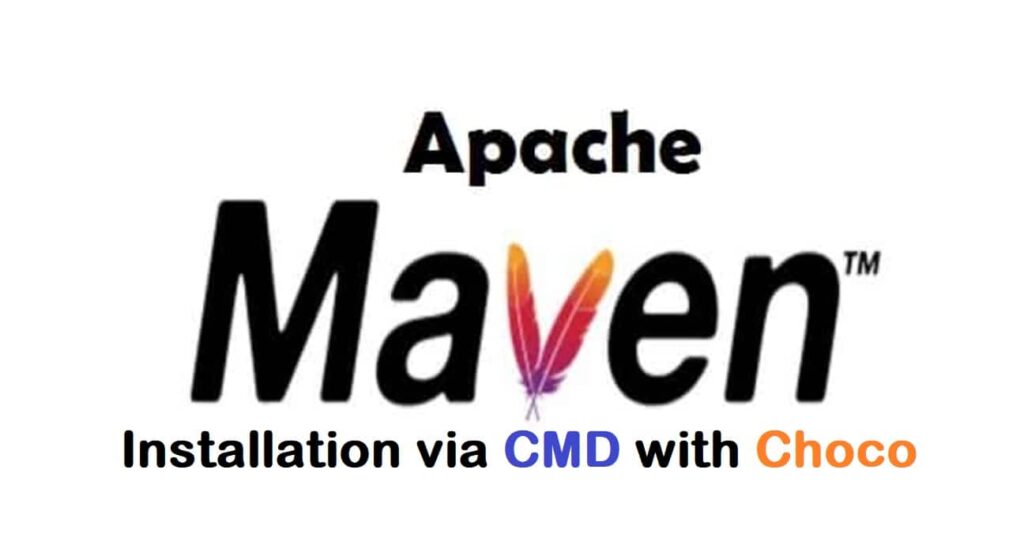
You must do it via CMD if you want a quicker way to install Maven. An example would be installing it on over 10 corporate computers. Follow the steps below:
- Install Chocolatey Package Manager by running the individual installation command mentioned here.
- Now, install Java if you haven’t already.
- Now enter “choco” and the name of any major software and it will install it for you, in our case its Maven so:
Paul@ninja-ide:~# C:\Users\Paul> choco install maven
4. Done.
FAQs on Mavin Installation
How to check if Maven is already installed on Windows 11?
The quickest way to check if Maven is installed is from CMD. Open CMD and type maven --version and it will show you if Maven is installed and what version is available. If it says command not recognized, then it is not installed.
Can I Install Maven from CMD in Windows 11?
Yes, you can Install Maven on Windows 11 from CMD but you shouldn't due to the straight forward process to be able to do it via the GUI setup.
Maven is not working after installation, how can I fix it?
Most of the times when Maven is not launching on Windows 11, it is due to the environment variable being added incorrectly. Please check all of your environment variables and paths and re-add them followed by a reboot will fix your problem.
Other installation tutorials and guides for Windows 11:
- How To Install NumPy in Visual Studio Code on Windows 11.
- Guide: Install PyCharm IDE on Windows 11.
- How To Fix uTorrent not working (2024).
Conclusion
In this tutorial, you learned how to Install Maven on Windows 11. Most importantly we also covered an alternative way allowing you to Install Maven on using CMD with the help of Chocolatey. In the installation process, most of the errors happen where users miss the additions of environment variables and paths that need to be added which we also added in this guide to make it easy for you.


")

")
")
")


")
