
You are quite efficient if you install third-party applications system-wide. After all, you get it once and then use the package from different python projects, this saves in a lot of time and space on the disk. However, some problems might arise with junk and overlapping libraries or environments.
You can avoid all of this by following our tutorial on how to activate, deactivate, delete and create Python venv environments with command examples that work on Linux, Windows and Mac.
What is Python venv and how it works
The PATH variable gets changes once you activate your environment. On Linux and macOS you can see by printing the path with echo $path. On Windows, you need to use %PATH%(in cmd.exe) or $Env:Path ( in PowerShell).
Now when you enter a command which can’t be found in the current working directory then your operating system begins to look at all paths there in the PATH variable. The same is for Python. Whenever you import any library it started to look in your PATH for library locations.
This is where the new magic of venv occurs; if it is in front of other paths, the operating system shall look first there before peeking into the system-wide directories such as /usr/bin. Therefore, anything which gets installed in venv is found first and that’s how you can override system-wide packages and tools.
On Linux and MacOS, you shall see the follow tree structure:
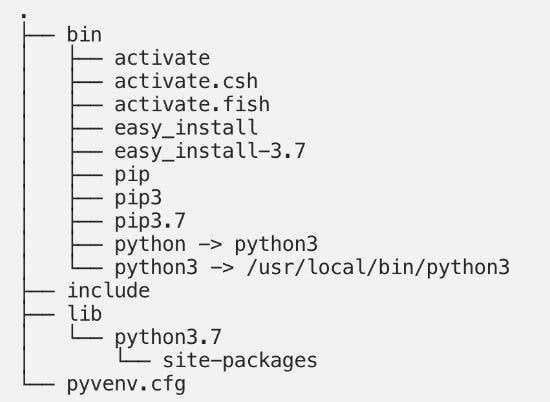
- On Linux and macOS Python command is made available as both Python and Python, the version to is pinned to the one with which you have created venv by creating a symlink to it.
- Python binary on windows is copied over to the scripts directory.
- Packages that are installed end up in the site-packages directory.
- There are activation scripts for different types of shells such as bash, csh, fish and PowerShell.
- You shall find pip under different names like pip and pip3, specifically under the name pip3.7 as we had version 3.7 installed.
ALSO SEE: The Best Python venv commands list.
Reason why people use Python virtual environments
As you can imagine that project Paul is written down against a specific version of Library Ninja. You may need to upgrade the library Ninja in the near future. For example, you require the latest version for another project known as IDE. You upgrade library Ninja to the latest and project IDE begins to work fine. But during this what you see is that your previous project A broke badly. After, APIs can change on major version upgrades.
Now, this is a very virtual environment that comes in handy, it is designed to fix such a problem by isolating the project from other and system-wide packages. You install packages within this environment, particularly for the project on which you are working.
The best thing is that it is easy to define and install packages specific to your project. When you use the “requirements.txt” file you can define an exact number of versions tested with code. Now, it also helps other users of the same software as the environment helps others to reproduce the same for which your software was built in the first place.
If you are working on a university or web hosting provider which is a shared host then you shall not able to install system-wide packages as you do not have administrator rights to do so. In such time, venv allows you to get anything you in your project locally.
Virtual Environment compared with Kubernetes, Docker or VMWare solution
You have other options as well to isolate your project:
- In some scenarios, you can get a second system and on it run your code. Though this would not be easy on the pocket your problem shall be solved.
- It is cheap but still needs you to install a complete OS. This is deemed to be a waste in many cases. You may need VMWare or Oracle VirtualBox and then install and fully configure an operating system.
- Then comes containerization with the likes of Kubernetes and Docker. These are quite powerful and a good alternate.
Create Python venv Environments with 3 simple commands
There are many ways to do this but it depends on the version of Python you are running.
Keep two tools in your mind; python poetry and pipenv. Both these combine functions of tools which you are about to learn: virtualenv and pip. Besides this they can add extras such as their ability to perform proper dependency resolution.
Use the following venv module:
Paul@ninja-ide:~# python –m venv [directory path]
Using this command shall help you create a virtual environment in the specific directory plus copies pip into it too. If you are not very sure on what to call the director then it is a commonly seen option and does not leave on guessing.
Other Versions of Python which are older:
Alternate which works for any version of python is using virtualenv package, but first what you need to do is install pip, for this use the following command:
Paul@ninja-ide:~# pip install virtualenv
Once this has been installed, create a virtual environment using:
Paul@ninja-ide:~# virtualenv [directory]
Activate Python venv environment
To activate this on Microsoft Window all you need to do is run a script that gets installed by venv, if you have created this in a directory known myenv, the command shall be as follows:
Paul@ninja-ide:~#C:\Users\Paul> venv\Scripts\activate.bat
Open PowerShell as administrator and run the below:
Paul@ninja-ide:~#C:\Users\Paul> venv\Scripts\Activate.ps1
Activating Venv in Linux and Apple macOS
With the help of the source code command, we activate the virtual environment on Linux and macOS. If this has been created in myvenv directory then the command shall be as followed:
Paul@ninja-ide:~# source myvenv/bin/activate
Now you are ready to rock and all, install packages with pip but we suggest that you keep reading to understand more.
ALSO SEE: Top 6 Best Python Books for Non-experienced programmers.
Deleting environment with Pipenv
This is much easier, simply use the following command:
Paul@ninja-ide:~# Pipenv –rm
Just keep in mind to be within the project directory.
If this does not work, don’t worry remove it manually. For this simply first you need to ask pipenv where the original virtualenv is located and then use the following command:
Paul@ninja-ide:~# $ pipenv --env/home/paul/.local/share/virtualenvs/ninja-ide
This shall output path to the virtual environment along with its files and look similar to the examples mentioned above. After this, all you need to do is remove the entire directory and that’s it you are done.
If you have created with poetry then list the ones which are available by using the following command:
Paul@ninja-ide:~# $ Poetry env list
Now, if you want to remove the environment use the poetry env remove command. For this, you need to specify the exact name from the above-mentioned output, such as: poetry env remove test-paul-ninja-env.py. You can also use an IDE such as Ninja to alter and create a script to run these at a scheduled time or in a sequence to save time.
Complete Deactivate Python venv
Once you’re done with your work the best thing is to deactivate it. By doing this you basically leave the virtual environment. If you don’t do this, python code shall execute even if it is outside the project directory it shall run within venv.
Paul@ninja-ide:~# Deactivate
The best thing is that it works on Windows, Linux and Mac setups.
ALSO SEE: Python Hacking Scripts Download with Source Code (Latest and Undetectable).
Deleting a venv environment
This can be done easily but it depends on what you used to create it. We have listed some common options for you which one you would have created with Virtualenv or Python –m venv.
You first need to deactivate it, and remove the directory and its content. On systems like UNIX and PowerShell, first deactivate it as showed up then:
If you see “venv” as the directory, run the below command to delete it permanently. Be warned that there is no coming back once removed.
Paul@ninja-ide:~# rm –r venv
Other Python tutorials you will enjoy:
- Python extensions you must have installed on Visual Studio.
- Guide to install NumPy library in Windows 11.
- How to create your own weather predicting weather app in Python.
Conclusion
Python venv saves a lot of time and helps organize projects which need isolation from others. This is where you can use our venv guide to create, activate, delete and deactivate environments. Hopefully, our command examples will clarify it all to you as they are compatible with Windows 10, 11, Linux and macOS.


")

")
")
")


")

Thank you for this post Paul, a very informative read indeed.
Thank you for your feedback Ollie, it means a lot.
Thank you Paul, your post was helpful.